AstroEQ Tutorials Wiki
Using the Configuration Utility
Configuring and Programming Your AstroEQ Board
With the release of AstroEQ6 and newer, configuring your mount couldn't be easier. AstroEQ can now be programmed with a compact utility which has been designed to allow the whole process to be completed within a single program. It is required that your computer has Java 1.8.0 installed, and optionally has EQMOD/ASCOM installed.
First Steps - Connect AstroEQ
Before running the utility you need to connect your AstroEQ board to a USB port on the computer. Be sure to connect the 12V power supply to your AstroEQ before connecting the USB cable, otherwise the AstroEQ will not connect properly.
Windows will then automatically install a virtual COM port associated with AstroEQ. If Windows says that it failed to install the driver, then it means it couldn't find it through Windows Update. This will most likely happen in Windows 7/8, but is not the end of the world.
If the driver fails to install, then you need to install it manually. Information on how to do this can be found Here . The driver can be downloaded from the Downloads page. Inside the archive is a file called âmchpcdc.infâ which is the AstroEQ Windows driver information.
Windows 10 users do not need to install the AstroEQ driver. The AstroEQ uses a standard USB CDC compatible interface with Microchip hardware IDs. Microsoft shipped a compatible driver as part of the Windows 10 OS which correctly identifies the hardware IDs of the AstroEQ controller and should install it automatically.
Starting the Utility
First you need to have downloaded and extracted the configuration utility from the Downloads page. Once extracted you will find an program called AstroEQ. This is the utility which is now used to program AstroEQ.
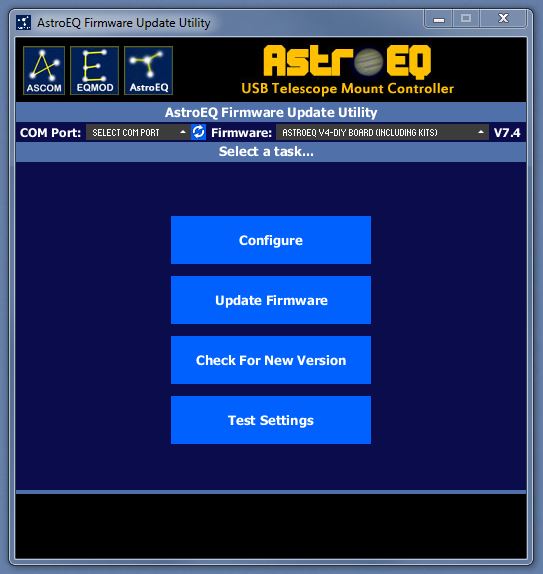
Upon opening the utility a splash screen will appear with the AstroEQ logo, this will then disappear and you will be presented with the home screen:
NOTE: For people using Windows Vista/7/8, you will be asked by Windows whether you want to allow AstroEQ to make changes to your computer. You will need to select Yes. Nothing on your computer will be changed, however UAC sees the term âUpdateâ and assumes it must require Admin rights.
From version 3.8.2 of the configuration utility, you will no longer be prompted for elevated rights. The configuration utility will correctly run without admin rights.
Once you can see the utility you will need to select the serial port of your AstroEQ board from the 'COM Port' dropdown menu. If you connect the controller after you have launched the utility, you can use the refresh button next to the drop down to rescan for COM ports.
You will also need to select which AstroEQ board you have from the 'Firmware' dropdown. For hardware bought from me, this will be the default selection. For Arduino Mega variants, you will need to select the corresponding entry.
There are 4 large buttons on the main screen. They have the following functions:
- Configure: This option allows you to modify the mount configuration without uploading the firmware. If you already have previously updated the firmware to the latest version, you can use this button.
- Update Firmware: If this is the first time you have downloaded this version of the configuration utility, or you wish to reflash the firmware, you can use this button. Once the firmware is programmed, you will automatically be taken to the configuration screen.
- Check For New Version: This button can be used to see if there is a new firmware or configuration utility version on the AstroEQ website.
- Test Settings: This allows you to try different configuration settings to see if they are compatible with the AstroEQ. You do not need any hardware connected to use this option.
AstroEQ Firmware Upload
When the âUpdate Firmwareâ button is selected, the AstroEQ firmware (the brains of the PCB) will be uploaded to the board. This process is performed via USB using the built in bootloader on the AstroEQ. You do not need any special hardware to do a firmware update, and the firmware is provided precompiled and so you do not need the Arduino IDE for this process.
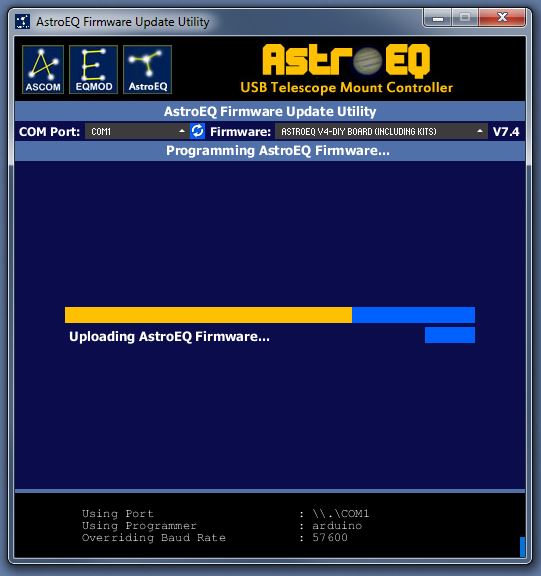
This process will take up to a minute depending on which board you are using. You will see information about the upload displayed in the console window at the bottom of the utility.
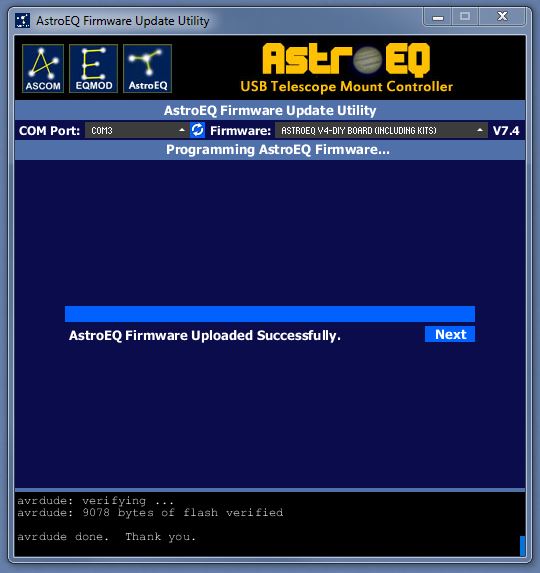
Once the upload is complete, you should see the above screen informing of a successful upload. Press Next to continue and move on to entering the mount configuration.
Should the upload fail it is possible that the mount was not correctly connected (power must be applied before the USB cable), or the wrong COM port or Firmware was selected. Disconnect and reconnect the board, make sure the correct COM port is selected and click the Retry button. If the problem persists, you can seek assistance on the AstroEQ Forum.
Loading Prior Configuration
Once the firmware upload is complete, or if you selected the Configure button from the home screen, the next step is for the configuration utility to attempt to read any existing configuration from the mount.
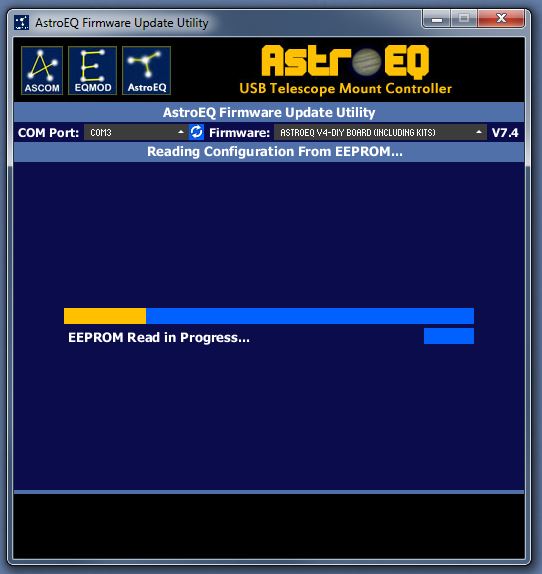
If a valid configuration is found, it will be read and you will be informed that a read was successful. Click the Next button to continue to the configuration screen. You can skip the next section of this tutorial if this is the case.
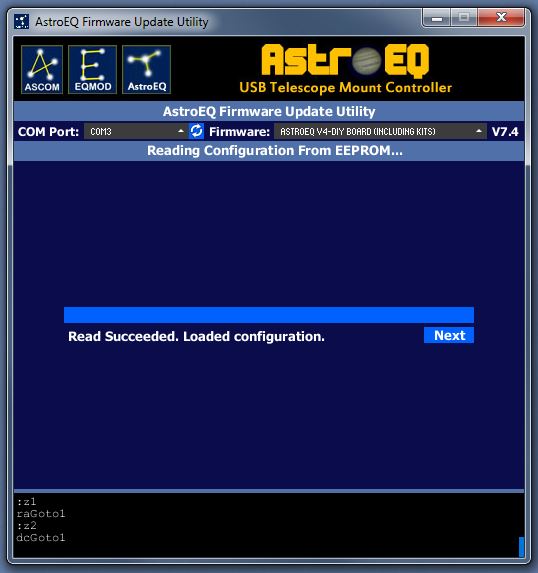
Should the read fail, it could mean that the EEPROM inside AstroEQ has become corrupted. If this is the first time you have programmed AstroEQ, the board will be blank. The utility will rebuild the EEPROM configuration file for you in the next step. You will see the following if this is the case:

Click Next to continue to the EEPROM repair step.
If you see a different error screen, you can seek assistance on the AstroEQ Forum.
EEPROM Repair
Since AstroEQ7, the main AstroEQ firmware has the ability to self program the EEPROM without the need for a separate firmware.
When the AstroEQ controller is first programmed, the EEPROM will need to be initialised. This will happen as part of the configuration step. When the configuration utility tries to read the contents of the EEPROM the AstroEQ controller will report whether or not the EEPROM contains valid data.
If you reach this screen it means the EEPROM doesn't contain valid data, or the data is corrupted. Click the Next button to start repair of the EEPROM. The AstroEQ firmware will be instructed to erase the EEPROM and reinitialise it ready for configuration.

Once the repair is completed (this will take 4-5 seconds typically), the AstroEQ is ready for configuration. Click the Next button to continue to the Configuration screen.

Configuring AstroEQ
It is time now to set the parameters for your Mount. For this you need to know information about your mount. The following are examples of information you will need to know:
- The step angle of the motors you are using.
- The gear ratio between the motor output shaft and the worm screw on the mount.
- The worm gear ratio. This is the number of teeth on the mounts main worm gear.
- What motor driver IC you are using.
- Whether or not to enable microstepping
If these are unknown, please refer to the common gear ratios page.
Over the years, AstroEQ has become more and more configurable with an ever growing feature set. As a result there are quite a few settings on the configuration screen as shown below. It may seem daunting at first, but the process is relatively straight forward.
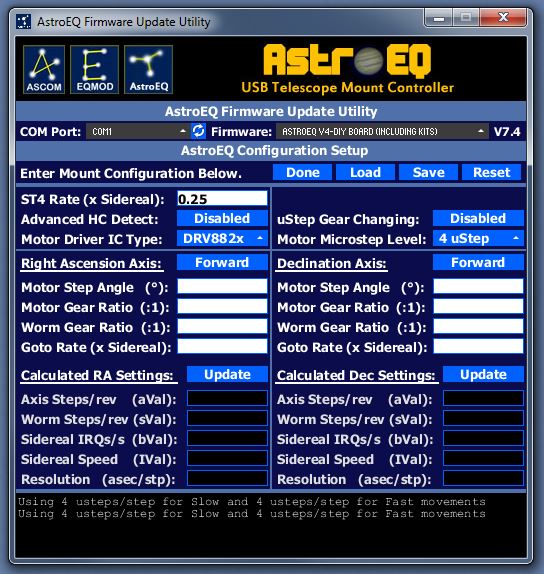
The screen is split into three sections:
- Global Settings: This is the section at the top of the screen, which contains settings applicable to the mount as a whole.
- Right Ascension Axis: This section is the bottom left of the utility and deals with settings related to the RA axis.
- Declination Axis: The bottom right section of the utility corresponds with settings for the Declination axis.
When configuring the mount you should start at the top and work down. That is you should start with the global settings, and then the RA/Dec settings. The following is a description of the Global Settings.
- ST4 Rate (x Sidereal): In this field you should enter a value between 0.05 and 0.95. This value represents the speed at which the mount will move when an ST4 signal is received. The speed is a factor of the sidereal rate - e.g. 0.5 means half the sidereal rate.
- Advanced HC Detect: This setting should only be âEnabledâ if you have a V4.6 or newer mount, or if you have performed the advanced hand-controller resistor modification. If you have an older version AstroEQ controller, leave this as âDisabledâ
- Motor Driver IC Type: This allows you to select which motor driver IC is used in the AstroEQ. All purchased controllers are shipped with a DRV882x type driver board. For custom controllers you may have other versions. If you are unsure, assume DRV882x.
- uStep Gear Changing: When a microstepping mode of 8 uStep or higher is used, the AstroEQ will change stepping modes (âgear changeâ) when performing a high speed movement such as a Go-To. This allows the mount to have a higher top speed at the expense of noise. This setting can be used to enable or disable this feature.
- Motor Microstep Level: This determines the number of microsteps to be used. For lower gear ratios, a higher microstep level should be used. Typical values are 4 uSteps, 16 uSteps and 32 uSteps.
Once the global settings are configured, you should move on to the RA and Dec axis settings. Each axis contains 5 settings.
The first setting is a toggle button which selects the direction of movement. This is either âForwardâ or âBackwardâ. Depending on the motors you use, the gearing, how the motors are wired, etc. you will need to select the correct direction of movement. The only way to do this is trial and error. First try with âForwardâ and then if you find the mount goes in the wrong direction (e.g. tracks the wrong way), change the setting to âReverseâ.
In the next three fields you should enter the motor step angle and gear ratios for each axis. These numbers can have a decimal point, which should be accurate to 8.d.p. for accurate calculation.
The final setting is the Goto Rate. This value is how fast GoTo movements should be performed. It is a multiple of the Sidereal rate, so a value of 100 would be 100 times faster than sidereal tracking. The value should be adjusted using trial and error. Start with a low value of around 40x and see if the mount can handle it. Try higher values if your mount performs well.
Once all the values are entered, click the 'Update' button for each axis. This will calculate the required information that the AstroEQ uses to determine how fast and how far to slew your mount. You will be informed of any errors in the values entered. If the calculation was a success, the console section below the configuration will inform you of a success.
To make configuration easier, the AstroEQ configuration utility now has the ability to save and load configuration files. You can use the Load and Save buttons at the top of the configuration screen to load preset or custom mount data, or to save your own mount configuration for loading later.
When you have finished entering a valid mount configuration, the Done button will become available. Click this to start programming the mount.
Programming the Configuration
The utility will now automatically store the values set on the previous screen to the AstroEQ EEPROM. Sit back, relax and wait a around 10-20 seconds while the values are stored for you.

If the configuration was stored successfully, you will see the following screen. Click next to continue to the testing step.

If the configuration fails, you can press the Back button and then try again. If it keeps failing, feel free to get in touch via the AstroEQ Forum.
Testing time
If EQMOD is installed on your computer, the AstroEQ Update Utility will automatically configure it for AstroEQ. This configuration is just a case of setting the EQMOD COM port to that which AstroEQ uses, no other EQMOD settings will be changed.
EQMOD will then be opened and you can test the AstroEQ board out using the Slew and track rate controls.
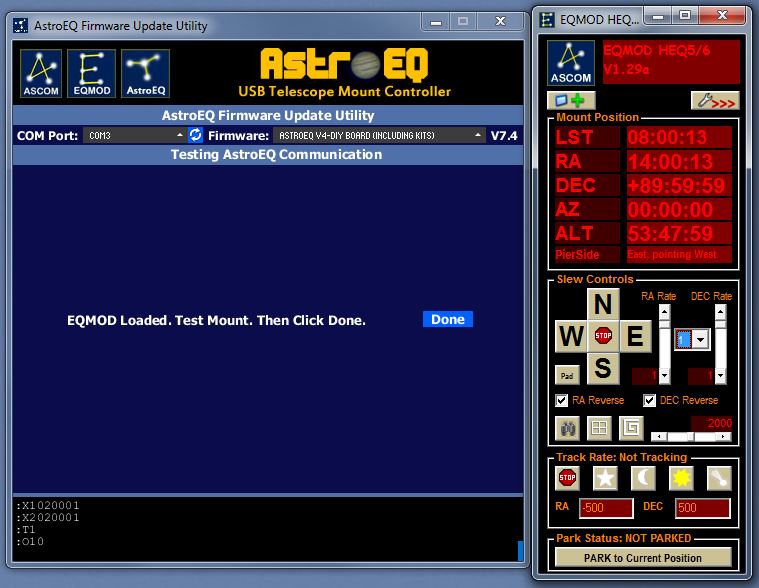
When you are finished testing, click the Done button in the configuration utility to close EQMOD.
Finished
If you have made it this far, AstroEQ is good to go.

Click the Finished button to close the AstroEQ Update Utility, or click Back to Start to return to the home screen.
You can run the utility any time you like if you need to change any values or settings. You do not need to run it each time you want to use the AstroEQ. The configuration is stored in the AstroEQ EEPROM which will be read by EQMOD any time you connect to your mount.

